
You’ve tried painting a soft gradient on your nails, only to end up with harsh lines or a murky mess. It’s frustrating, especially when you see those smooth, airbrushed ombre manicures all over social media. The good news? The secret isn’t a steady hand or expensive tools — just a simple makeup sponge. If you’ve ever thought about the cost of ombre nails at a salon, this guide will help you skip that bill entirely and nail it at home.
In this tutorial, you’ll learn exactly how to choose the right sponge, prep your nails, blend like a pro, and fix every hiccup along the way. Let’s start with the basics.
What Are Sponge Ombre Nails and Why Use a Sponge?
Sponge ombre nails are a nail art technique where two or more polish colors are applied to a sponge and dabbed onto the nail, letting the shades blend gently without harsh lines. The result is a smooth, soft gradient that shifts from one color to another — similar to an airbrushed finish you’d expect from a professional salon.
You might think a fine nail art brush could do the same job, but the polish dries too fast, and brushes leave visible streaks. A sponge, especially one with small open pores, holds just enough polish to deposit color while blending the edges as you bounce it on the nail. That simple dabbing motion is what softens the transition.
What most people don’t realize is that the sponge lifts a tiny bit of wet polish each time it touches the nail, helping the layers melt together naturally. This self-blending quality is what makes the technique so forgiving and beginner-friendly from the very first try.
What Is the Best Sponge for Ombre Nails? Makeup Sponge, Beautyblender, or Kitchen Sponge?
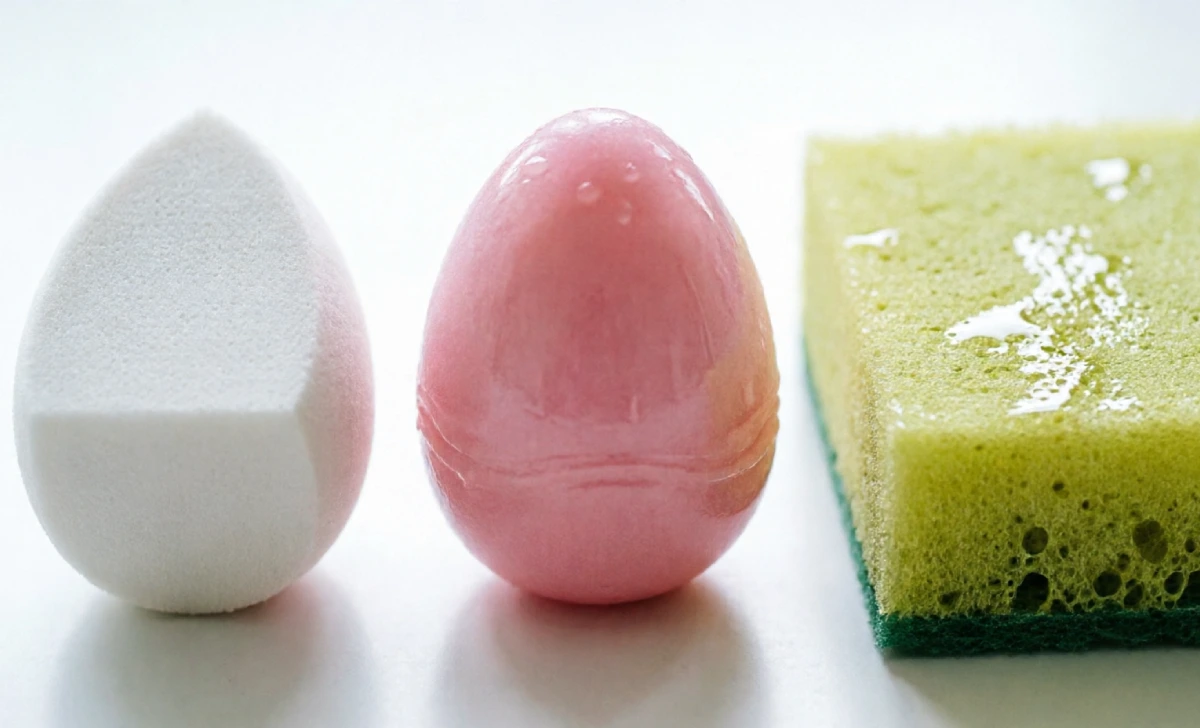
Not all sponges behave the same way, and choosing the wrong one is one of the most common beginner mistakes. The classic white wedge makeup sponge — the kind sold in bulk at the drugstore — is almost always your best option. It’s fine, open pores hold just enough polish without absorbing too much, giving you that soft, diffused gradient.
A Beautyblender or dense egg-shaped sponge can work too, but it behaves differently. Because it’s tighter and less porous, you’ll need to dab more times to build opacity, and the blend can feel more abrupt. If that’s all you have, dampen it slightly before use to help it perform closer to a wedge.
Kitchen sponges are best avoided entirely. Their large, uneven holes absorb polish inconsistently and leave a bumpy, bubbly texture on the nail. Stick with a clean cosmetic wedge, and you’ll sidestep one of the biggest frustrations in this technique.
Essential Tools and Product Checklist for Sponge Ombre Nails
Before you open your Polish collection, setting up your workspace with the right supplies makes the whole process smoother. A good base coat is non-negotiable — it protects your nails from staining and gives the polish a sturdy surface to grip.
You’ll also need a quick-dry top coat for sealing, plus liquid latex or plain scotch tape to shield your cuticles from the polish overspray that sponging creates. Acetone and a small, angled brush will let you clean up stray edges after the gradient is done. Keep a nail file and a buffer nearby, too, since a smooth nail surface helps the gradient lay flatter and last longer.
Prepping Your Nails: The Foundation for a Flawless Sponge Ombre
Even the best blending technique won’t save a manicure built on unprepared nails. Start by removing any old polish, washing your hands, and gently pushing back your cuticles. File your nails into your preferred shape now, because you won’t want to disturb the gradient once it’s on.
Lightly buff each nail surface so the base coat has a textured layer to cling to — this simple step can add days of wear. Wipe every nail with a cotton pad soaked in acetone or rubbing alcohol to remove the last trace of natural oil. Skipping this is the number one reason gradients peel within a day or two.
Apply a thin, even layer of base coat and let it dry fully before moving on. Solid prep is what separates a manicure that chips by Tuesday from one that stays flawless all week.
Color Combination Secrets for a Stunning Ombre Gradient
Color choice matters more than most beginners expect, and a poor pairing can turn a smooth blend muddy, no matter how well you sponge. The easiest approach is to pick two shades that sit next to each other on the color wheel — soft pink and coral, or sky blue and lavender — because these naturally melt together. If you want seasonal inspiration, fall ombre nail colors are a great starting point for warm palettes that blend beautifully.
Creme-finish polishes without shimmer tend to give the cleanest, most predictable gradient. Shimmer and glitter formulas can still work, but the particles sometimes disrupt the smooth fade. For colors that really pop, paint one coat of white polish on the nail first — it amplifies neons and pastels dramatically.
How Do You Do Sponge Ombre Nails Step by Step?
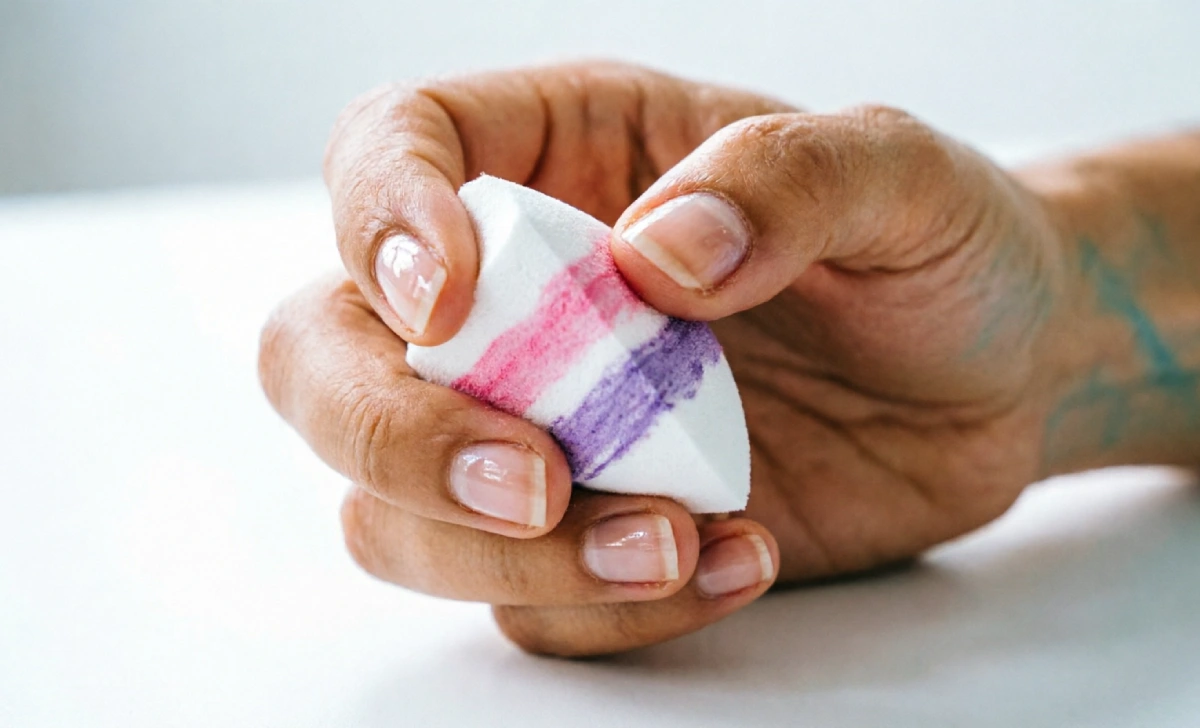
Start by cutting a small piece of your makeup sponge — roughly the size of your nail. Run it under water briefly, then squeeze out every drop of excess moisture. It should feel barely damp, not wet. This keeps the polish from soaking into the sponge too fast and gives you more blending time.
Paint your two chosen colors side by side directly onto the sponge, overlapping them slightly where they meet. Work fairly quickly here, because if the polish starts drying on the sponge before you dab, it won’t transfer smoothly onto the nail.
Hold the sponge over your nail and gently press it down, then lightly rock or bounce it upward a few times. This is the dabbing motion that blurs the line between colors — don’t swipe, don’t rub, just tap. You’ll see the gradient begin to appear as the shades build and overlap.
If the first pass looks sheer or faint, that’s completely normal. Let it rest for about thirty seconds, reload your sponge if needed, and dab again. Building two or three thin layers is the real secret to a smooth, airy fade that doesn’t look thick or clumpy.
Why Is My Ombre Patchy? Troubleshooting Sponge Ombre Problems
Patchy ombre is the most common complaint, and almost every case has a straightforward fix. If you notice small bare spots where the polish barely transferred, you’re likely pressing too hard or not reloading the sponge with fresh polish often enough. Try a lighter touch and refresh the color stripes every nail or two.
Sometimes, patchiness is actually a moisture issue. A completely dry sponge grabs the polish instead of releasing it evenly, leaving a speckled surface. Lightly pressing the sponge against a damp paper towel before loading it with color can make a noticeable difference.
A sponge that’s too dense is another frequent culprit. Switching to a softer wedge can instantly improve the blend. And if your polish dries too quickly on the sponge itself, try adding a drop of nail polish thinner to the bottle or moving to a slightly cooler spot in the room.
How Do You Clean Up Sponge Ombre Nails Without a Mess?
Polish on the skin around your nails is almost unavoidable with the sponge method, but you don’t have to accept messy cuticles. The easiest fix is to paint liquid latex around each nail before you begin sponging. Once your gradient is dry, peel the latex away, and all the overspray comes with it cleanly.
If you don’t have liquid latex, adhesive tape is a reliable substitute. Press small strips along the sidewalls and just above the cuticle, leaving only the nail plate exposed. Carefully lift the tape while the polish is almost dry but still slightly tacky, and you’ll be left with clean, crisp edges.
Even without any barrier, a neat result is still achievable. Once your gradient is fully dry, dip a small, stiff brush into pure acetone and slowly trace around each nail to remove any polish from the skin. Work patiently — the finish will look surprisingly professional.
How Do You Apply Top Coat Over Ombre Nails Without Smudging?
Smudging a beautiful gradient at the very last step is heartbreaking, but it’s completely avoidable. Load your top coat brush with a generous bead of product so the bristles float above the nail surface rather than dragging across it. That single adjustment protects the design underneath.
Wait about two minutes after your final sponged layer before reaching for the top coat. A fast-drying top coat is especially helpful here because its thinner formula glides over the design without pulling the colors apart. With a gentle, floating hand, your ombre will stay perfectly smooth and glossy.
Can You Do Sponge Ombre Nails with Gel Polish?
Yes, and the result is incredibly durable — but the process needs a few adjustments. If you enjoy doing gel nails at home, the sponge ombre technique translates well with some patience. The most important rule is to work in extremely thin layers, since gel builds up quickly and thick coats won’t cure evenly.
Paint your gel polish stripes onto the sponge, dab onto the nail, then cure each sponged layer under your UV or LED lamp before adding the next. This locks the gradient in stages and keeps the colors from blending into a muddy middle. Some sponges shed tiny fibers in uncured gel, so rolling a lint roller over your sponge before starting helps prevent that.
Finish with a gel top coat and cure it fully. Because gel doesn’t air-dry, you have more time to perfect your dabbing — and once it’s cured, your ombre can stay chip-free for two to three weeks.
How Long Do Sponge Ombre Nails Last and How Do You Remove Them?
With a solid base coat, carefully sponged layers, and a quality top coat, a regular polish ombre can last a full five to seven days. Applying a fresh layer of top coat on day three helps defend against tip wear and keeps the gradient looking vivid. If you want fresh seasonal inspiration, check out these fall ombre nail ideas to try with your new technique once you’ve mastered the basics.
When it’s time to remove your manicure, avoid picking or peeling at all costs. Soak a cotton pad in acetone, lay it on the nail, and wrap the fingertip in a small piece of foil. After about ten minutes, the polish will slide off gently without any scraping, leaving your natural nails healthy and undamaged.
Frequently Asked Questions About Sponge Ombre Nails
Can I use a regular kitchen sponge if it’s brand new?
Kitchen sponges have large, uneven pores that create bubbles and a rough texture on the nail. Even a new one won’t give you the smooth gradient that a fine-pore cosmetic wedge delivers.
What should I do if my polish dries too fast on the sponge?
Move away from fans or open windows, and dampen your sponge just slightly more than usual. Adding a drop or two of nail polish thinner to your bottle also buys extra blending time.
Can I create a reverse ombre with the same technique?
Absolutely. Just flip the color order on your sponge so the lightest shade sits near the cuticle instead of the tip. The dabbing method stays the same — only the placement of colors changes.
How can I make the colors look more vibrant on deeper skin tones?
Apply one coat of white polish as your base before sponging. It amplifies the true color of any shade, and pairing it with highly pigmented creme polishes makes the gradient pop beautifully against all skin tones.


