

When I first opened a gel kit, I spent twenty minutes staring at the bottles before touching a single one. If that sounds familiar, you are in the right place. This guide shows you exactly how to do gel nails at home — from prepping your nails to two weeks of lasting color — so you can do it at home, even if tonight is your very first try.
What Is the Secret to Long-Lasting Gel Nails at Home?
Most people think a salon-quality result comes from buying expensive polish. It doesn’t. The secret is the full sequence — prep, thin layers, correct curing — done in the right order every time. Skip one step, and you are setting up a lifting problem before you ever open the color bottle.
Think of your nail plate like bare wood before painting. If there is any oil or dust on it, the paint will peel no matter how good the brush is. Gel works the same way. Every action in this guide gives your polish a clean, dry, textured surface it can actually grip.
The Complete Beginner’s Gel Nail Kit Checklist
You do not need a salon supply closet to start. A focused, simple kit will take you from bare nails to a glossy set without confusion or wasted money. Here is everything you actually need, and nothing you don’t.
The lamp is the most important purchase you will make. A quality 48-watt LED lamp cures all five fingers at once and cuts curing times significantly compared to older UV lamps. Budget options like SunUV and MelodySusie deliver solid results for under thirty dollars.
The three core gel bottles — base coat, gel color, and no-wipe top coat — form the backbone of every set. Brands like Beetles, Modelones, and Gellen offer beginner-friendly starter kits with all three included. You do not need to mix and match brands when starting.
Your prep tools are not optional. You will need an 180-grit nail file, a soft buffer block, a cuticle pusher, nail dehydrator or isopropyl alcohol, lint-free wipes, pure acetone, soak-off clips, and cuticle oil. Before you start, it also helps to understand your nail options. If you have been weighing gel vs acrylic nails, knowing the difference will help you pick the right system for your lifestyle.
How Do You Prep Your Natural Nails So Gel Adheres Perfectly?

Prep is where your manicure either succeeds or silently fails. More gel sets fall apart here than at any other point, because it is the step most beginners rush through to get to the color. Slow down here, and everything that follows becomes easier.
Start with your cuticle pusher. Use slow, gentle strokes to nudge the thin skin back from the nail plate. You are not cutting anything — just revealing more nail surface and removing the invisible residue that skin leaves behind. Gel cannot bond to skin residue, and it will lift from that exact spot within days.
Next, use your 180-grit file to shape the free edge — round, square, or soft oval. Then sweep your buffer lightly across the entire nail surface until the natural shine disappears and the nail looks softly matte. You are not thinning the nail. You are creating a texture that the base coat can physically grip.
Finally, saturate a lint-free wipe with a dehydrator or isopropyl alcohol and scrub each nail thoroughly, including the sidewalls. The nail should look almost chalky white when the oils are gone. From this moment until your base coat is cured, do not touch your nails with bare fingertips — you carry oils there too.
How Do You Apply Base Coat Without Flooding Your Cuticles?
Base coat is the foundation that holds everything together. The most important rule is to leave a tiny hairline margin around your cuticle and sidewalls. If gel floods onto the skin and cures there, it creates a lifted edge the moment the skin moves — and skin always moves.
Dip your brush, wipe off the excess on the bottle neck, and place it slightly away from the cuticle. Gently push the gel bead backward toward the cuticle line, stop just short of the skin, then sweep forward to the free edge in one smooth stroke. This float technique keeps the application clean and prevents flooding. Finish by running the brush along the tip of your nail to seal the edge.
Cure the base coat under your LED lamp for 30 to 60 seconds. When it comes out, the surface will look slightly tacky — that is exactly right. That sticky layer is what your color will grip onto next.
How Long Should You Cure Each Layer Under a UV or LED Lamp?
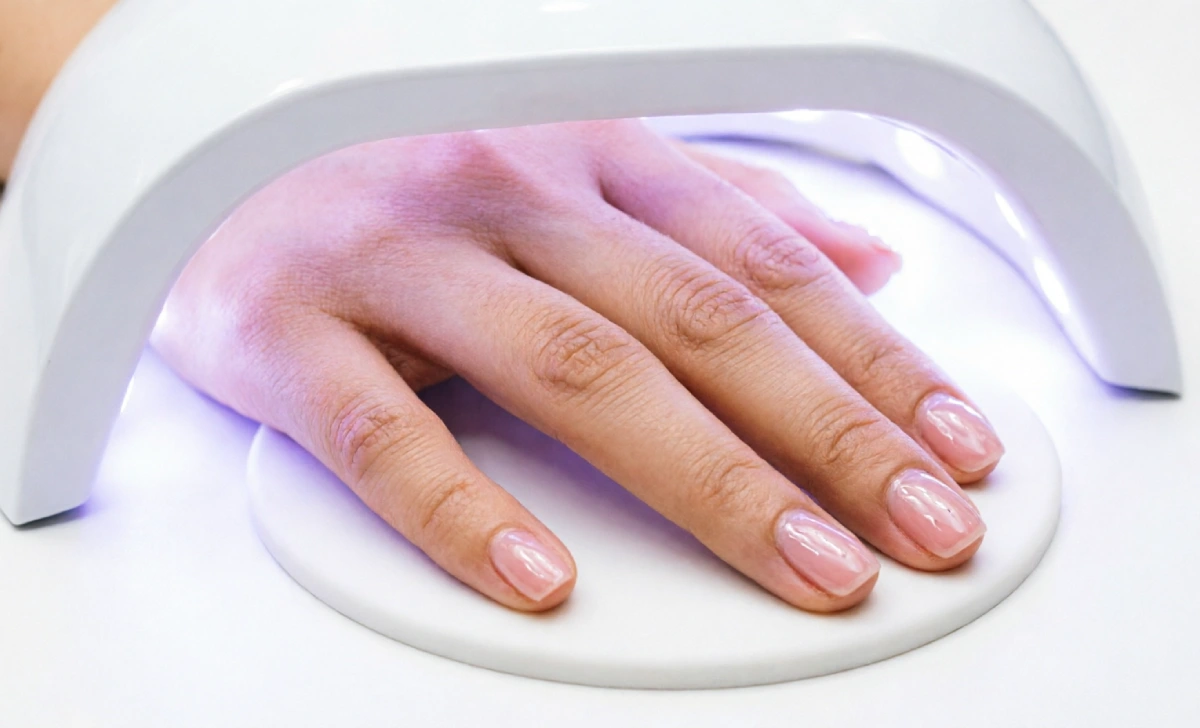
Curing time is the most misunderstood part of home gel nails. A standard 48-watt LED lamp cures a thin gel layer in 30 to 45 seconds. A lower-powered or traditional UV lamp may need up to two full minutes per layer.
Always treat your brand’s recommended cure time as a minimum, not a fixed rule. Under-cured gel feels hard on the surface while staying partially liquid underneath. That trapped uncured gel causes peeling — and repeated exposure to uncured gel on skin is the leading cause of permanent gel allergies, which can appear suddenly after months of use.
If you feel a sharp heat spike under the lamp, slide your hand out slowly, rest it palm-up for a few seconds, then reinsert it. This happens when thick gel releases energy during curing. Thinner layers and a slow, steady hand placement prevent it every time.
The One Gel Color Application Technique That Makes a Difference
Thin coats are everything with gel color. A thick, opaque swipe in one pass cannot cure evenly — it wrinkles under the lamp and peels away in sheets within days. The float technique you used for the base coat applies here too.
Load your brush and wipe one side against the bottle neck so only one face of the bristles carries gel. Place the brush flat and let it glide rather than pressing down. The first coat will look sheer and streaky — that is exactly correct. Cure it fully before applying the second coat.
Two to three thin coats build full, even opacity. As you work, check your skin line after each hand. If color touches the skin before curing, wipe it away immediately with an alcohol-dipped brush. Cured gel on skin is a genuine allergy risk that can cause permanent sensitivity, so clean-up before the lamp is non-negotiable.
How Do You Seal Gel Nails with a No-Wipe Top Coat?
Top coat is the armor that locks in all your color work. A no-wipe formula cures to a complete, smudge-free gloss with no sticky layer to clean away afterward. When the lamp beeps, your nails are finished and ready.
Apply top coat with the same floating motion, but slightly more generously than the color layers. Cover the full nail and run the brush along the tip to seal the free edge. Cure for 60 seconds under LED or two minutes under UV. After the timer ends, give your nails a moment before touching anything. The finish should feel cool, hard, and deeply glossy.
Why Do My At-Home Gel Nails Lift or Chip So Fast?
Lifting always has a traceable cause — it is never random. If the gel peels off as a complete sheet with a shiny nail underneath, the prep failed to remove the surface oils. The gel never found a surface it could grip.
If lifting starts in a crescent near the cuticle, the base coat floods the skin during application, creating a lifting seam. If the free edge chips in flakes, the layers were too thick or the tip was not sealed with each coat.
Moisture is another hidden cause. If you showered or soaked your hands within an hour before your manicure, your nails absorbed water and expanded slightly. When they dry and contract under the cured gel, the bond breaks. Always start on dry nails — this single adjustment can add several days to your wear time.
The Damage-Free Way to Remove Gel Polish at Home
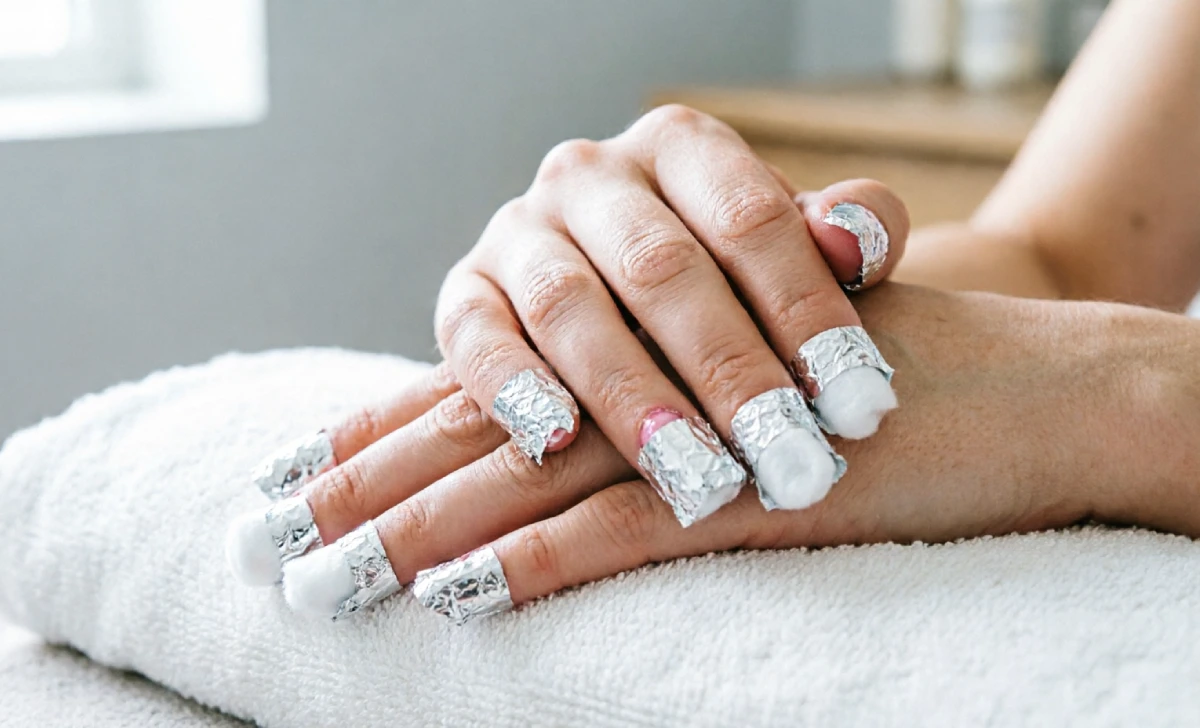
The most dangerous moment in a gel manicure’s life is when a lifted corner appears, and your fingers drift toward it. Peeling gel pulls actual layers of nail keratin away, leaving behind thin, fragile nails that take months to recover. Safe removal takes patience and nothing else.
Use your buffer to lightly scuff the shiny top coat on every nail — just enough to break the seal so acetone can soak through. Saturate a small piece of lint-free cotton with pure acetone, place it on the nail, and wrap the fingertip snugly with a soak-off clip or foil. Repeat for all ten fingers and wait ten to fifteen minutes.
When you remove the clips, gently push the softened gel off with your cuticle pusher. If it does not slide away, re-wrap and wait five more minutes. Never force it. Once your nails are bare, massage cuticle oil generously into each nail and the surrounding skin right away.
How Do You Keep Your Natural Nails Strong After Gel Removal?
Bare nails after removal can look pale and dry, which leads many people to blame gel for the damage. In most cases, improper removal and skipped aftercare are the real culprits — not the gel itself.
Cuticle oil is your most powerful recovery tool. Apply it morning and night, massaging it into the nail plate and surrounding skin. A jojoba-based oil penetrates deeply and restores flexibility to the keratin layers. Consistency here heals more than any strengthening treatment.
If your nails feel thin or bendy, take five to seven days before your next set. Keep them short to prevent tearing and stay consistent with the oil routine. Think of it as a rest day between workouts — your nails are resilient, and with regular recovery time, they will stay strong through years of home gel manicures.
Common Questions About Doing Gel Nails at Home
What is the difference between gel polish and regular nail polish?
Regular polish dries through evaporation and stays soft for hours. Gel polish contains photoinitiators that harden under UV or LED light in under a minute, creating a chip-resistant shell that regular polish cannot match.
Can I use any LED lamp to cure gel nails?
You do not need the same brand as your gel polish, but your lamp must produce at least 48 watts to cure gel fully through to the lowest layer. Check your polish brand’s wattage recommendation before buying, especially for thicker builder gels.
How often should I take a break from gel manicures?
A one-week break every two to three months works well for most people. If your nails feel thin, peel at the edges, or bend more than usual, take a rest sooner and focus on daily cuticle oil until they recover.
What should I do if gel accidentally touches my skin before curing?
Wipe it off immediately with an alcohol-dipped brush or lint-free wipe before that hand goes near the lamp. Curing gel onto skin bonds the photoinitiators to the skin’s surface and is the primary cause of gel allergies, which are permanent once they develop.
Conclusion
You now have a complete, damage-free system for gel nails at home — from the first file stroke to the final drop of cuticle oil. The secret was never talent or expensive products. It was always preparation, thin layers, and patience. Trust the process, never rush the prep, and your manicure will last. Now go plug in your lamp.
")


