
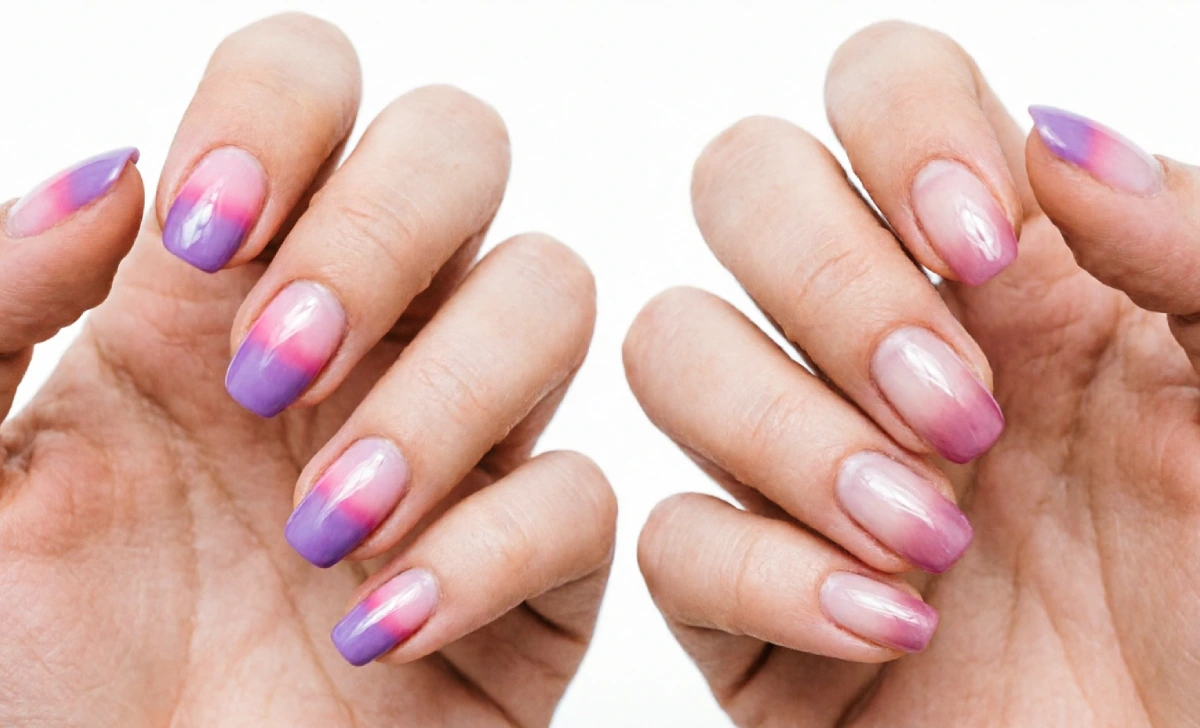
You’ve probably seen both looks all over your feed and assumed they were the same thing. One photo shows colors blending sideways across a nail, and another fades softly from light to dark from base to tip. If you’ve mixed up gradient vs ombre nails before, you’re not alone.
Gradient nails blend two or more different colors horizontally across the nail. Ombre nails fade one color vertically, from light at the cuticle to dark at the tip. Everything else below explains how to spot each one, recreate it, and pick the right style for your nails.
What’s the Real Difference Between Gradient and Ombre Nails?
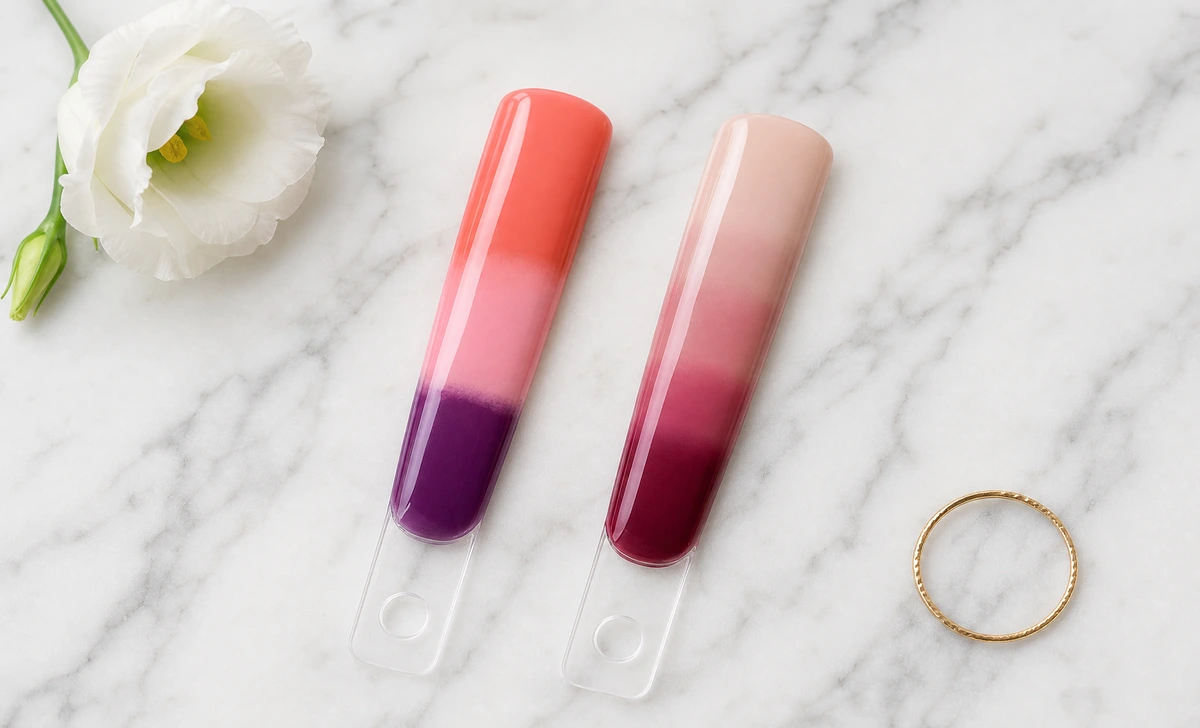
The real difference comes down to two things: the direction of the fade and how many color families are involved. A gradient nail blends two or more completely different shades horizontally across each nail. An ombre look transitions vertically from light to dark, usually within one color family.
Think of a gradient as a sunset stretching sideways — orange, pink, and purple melting into each other from one side to the other. Ombre nails are more like a paint chip card, starting pale near your cuticle and deepening toward the tip. Both styles use blending, but the fade direction and color choice set them apart.
| Gradient Nails | Ombre Nails | |
|---|---|---|
| Fade direction | Horizontal (side to side) | Vertical (cuticle to tip) |
| Colors used | 2–4 different shades | One color family, light to dark |
| Best for | Longer nail beds, bold looks | Shorter nails, elongating effect |
| Common tool | Makeup sponge | Sponge or small flat brush |
| Vibe | Playful, artistic | Polished, understated |
Once you understand this rule, you can spot which style you’re looking at instantly — and ask for it by name without second-guessing.
Gradient Nails Defined: What They Look Like and How They’re Created
Gradient nail designs have a playful, artistic energy that makes them a favorite for color lovers. You’ll typically see two, three, or even four distinct shades sitting side by side and then blurred together with a sponge to create a seamless horizontal blend. The result is a vibrant, multi-tone look that can go bold or soft depending on your color picks.
Most people create gradient nails using a small makeup sponge and regular nail polish. You paint stripes of your chosen colors directly onto the sponge, then gently press and roll it onto the nail. This dabbing action pushes the shades together until the lines disappear into a smooth, airbrushed finish.
Pros: highly customizable, works with almost any color combo, forgiving of small mistakes since blending hides imperfections. Cons: can look busy on very short nails, needs a steady hand to avoid muddy color transitions.
If you’re exploring nail shape options too, knowing your shape helps you pick the gradient direction that flatters your nails most.
Ombre Nails Defined: The Classic Light-to-Dark Style Explained
Ombre nails carry a more understated, elegant reputation, but they’re still full of versatility. The word “ombre” comes from the French word for “shaded,” and in nail art, it means a single color that gradually deepens from the cuticle to the nail tip. You’ll often see this in nudes, pinks, and berries, but any hue can work.
To achieve a true ombre, you work within one color family. You pick a very light version of the shade for the base and a richer, deeper version for the tip. Some people use a sponge, while others prefer a fine nail art brush to gently pull pigment upward and blend the boundary.
Pros: elongates the look of shorter nails, easier to keep looking neat as it grows out, reads as polished for work or events. Cons: fewer color combinations than gradient, a poorly blended line is more noticeable since there’s only one transition point.
This technique creates an elongating effect that makes fingers look longer and nails appear more slender. That’s why ombre nails are a top pick for bridal looks, office-friendly manicures, and anyone who wants a polished finish with a little something extra.
Are Gradient and Ombre Nails Actually the Same Thing?
You might still feel skeptical, especially when tutorials label a look “gradient ombre nails” as if it’s one thing. In reality, the two terms are not interchangeable, even though the nail world sometimes treats them that way. A gradient uses multiple distinct hues blending horizontally, while ombre stays within one color story and fades vertically.
The confusion often traces back to hair styling. In hair, ombre describes a dark-to-light fade, and gradient sometimes describes a multi-tone blend. When the terms migrated to nails, influencers and brands started using them loosely, which is why you’ve run into mixed messages online.
A side-to-side blend of pink and blue is a gradient. A soft nude deepening into rich mocha at the tip is an ombre. That one rule settles it every time.
Which One Should You Choose for Your Next Manicure?
Your choice comes down to the mood you want and the shape of your nails. If you love color, contrast, and a playful edge, a gradient manicure will probably be your pick. It works especially well on longer nail beds where the horizontal blend has more room to shine.
Ombre nails tend to flatter shorter nails beautifully because the vertical fade draws the eye upward and creates the illusion of length. They also feel more refined, making them a smart choice for formal events or work settings. For seasonal inspiration, check out these fall ombre colors that suit cooler months perfectly.
Think about your season and outfit palette too. Bright gradients feel right at home in summer, while a deep, moody ombre fits autumn beautifully. There’s no wrong answer — just the style that makes you feel most like yourself.
How to Do Gradient Nails at Home: A Step-by-Step Guide for Beginners
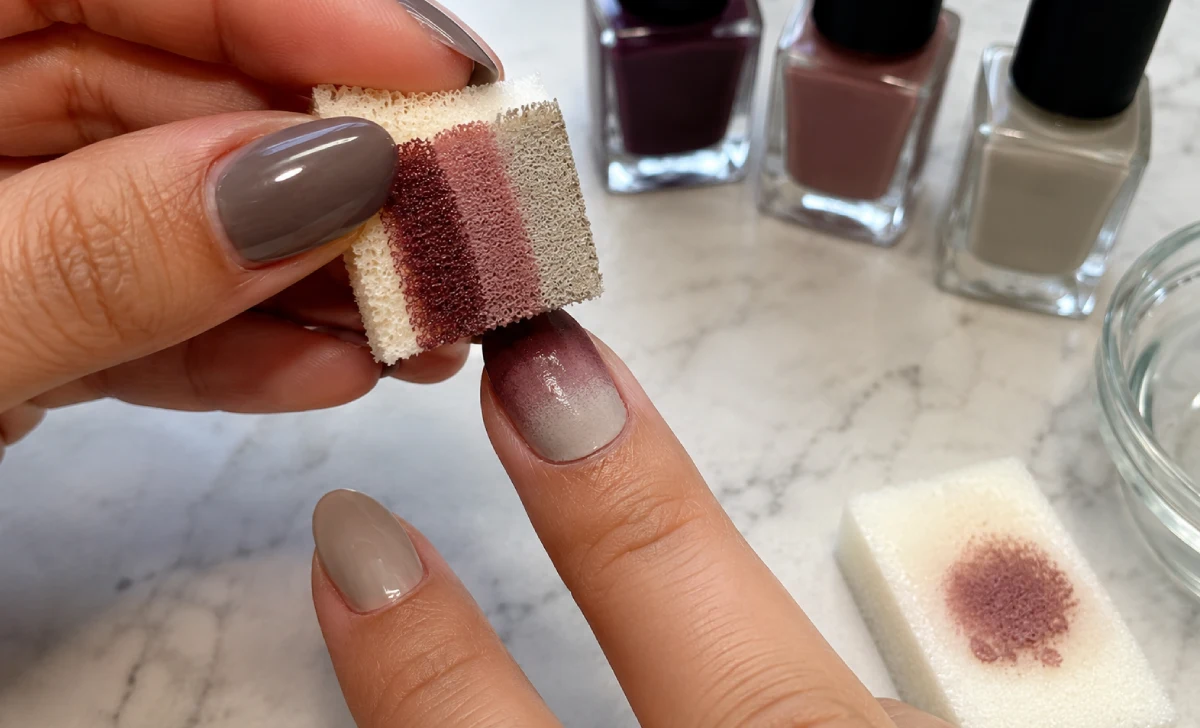
You don’t need professional training to create a gorgeous gradient at home.
- Protect the skin around your nails with liquid latex or petroleum jelly so cleanup stays easy.
- Apply a white base coat first — this makes your colors pop and keeps the blend from looking muddy.
- Paint stripes of your two or three chosen polish shades directly onto a slightly damp makeup sponge. The dampness stops the sponge from soaking up too much polish at once.
- Press the sponge onto your nail with a gentle rolling motion, lifting and repeating until the colors melt together. Work one nail at a time so the polish stays fresh.
- Build opacity with two or three dabbing layers.
- Apply a glossy top coat while the polish is still slightly tacky to smooth out any sponge texture.
How to Achieve Perfect Ombre Nails with a Sponge or Brush
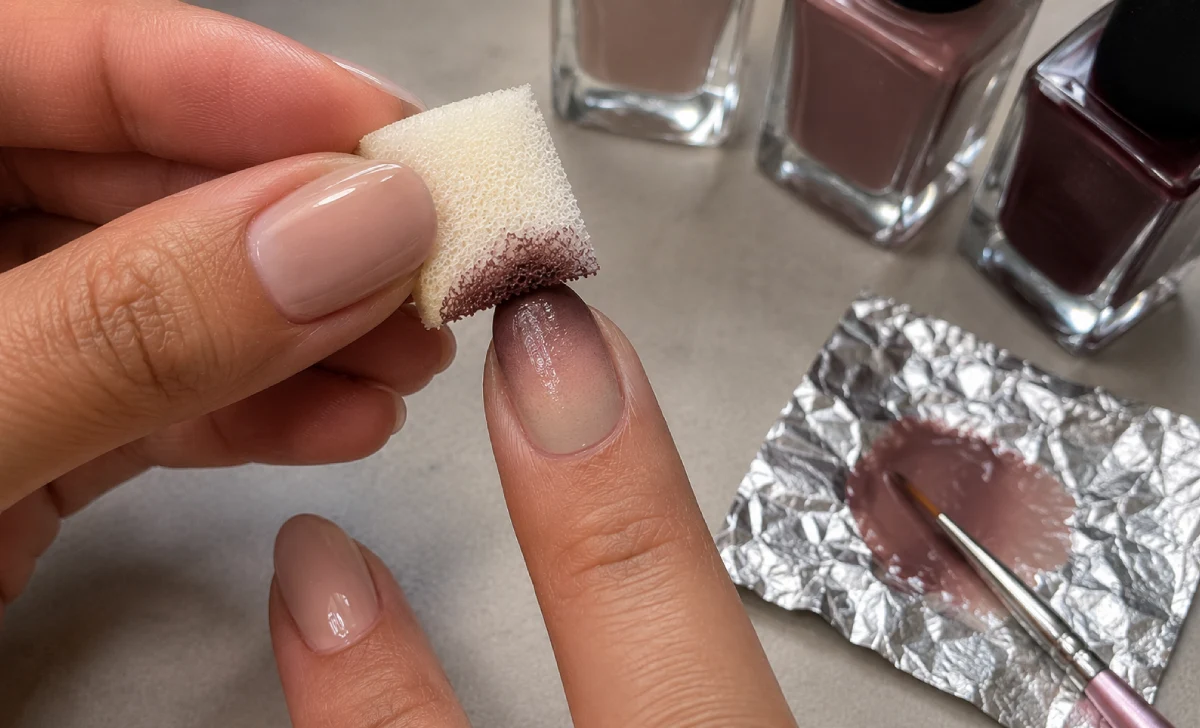
Ombre nails look impressive but are actually very forgiving to create.
- Begin with your lightest shade as the base across the whole nail and let it dry completely.
- On a small piece of foil, place a drop of your darker shade next to your light shade, then mix a mid-tone between them using a toothpick.
- Dip a clean makeup sponge into the darker color and lightly dab it onto the tip of your nail, pulling the color slightly upward.
- Pick up the mid-tone and apply it right above the dark section, blending both upward and downward.
If sponges aren’t your preference, a small flat brush works well too — paint the dark color on the tip and, while still wet, feather the edge upward with a clean brush until the line softens. Both tools work; it just takes a few practice runs to find your pressure, whether you choose a sponge or brush.
What Nail Colors Work Best for Gradient and Ombre Nails?
Your color choices can make or break the final look. For gradient nails, pick shades that contrast enough to stand out individually but still blend well — think coral and turquoise, or lavender and mint. Colors that sit near each other on the color wheel blend most smoothly, while opposite shades create a bolder effect.
Ombre nails thrive on monochromatic palettes. A classic option is a creamy nude at the cuticle, deepening into a rich espresso at the tip. You can also try soft baby pink into bold fuchsia, or icy white melting into deep navy for a winter-ready finish.
Don’t overlook finishes either. A glossy top coat amplifies both styles, while a matte coat gives them a velvety, modern feel.
Common Mistakes to Avoid When Blending Nail Polish
One of the biggest blending mistakes is using a sponge that’s too dry or too soaked. A dry sponge leaves a patchy, speckled mess, while an overly wet one makes colors slide into a muddy wash. Lightly dampening the sponge hits the sweet spot for smooth, even transfer.
Another common slip is skipping the white base coat under a gradient. Dark or sheer base shades dull the brightness of your colors and make the blend look faded. That one white layer underneath makes every shade you apply pop true to the bottle.
Rushing the process and skipping extra dab layers often results in a faint, barely-there design. Build opacity gradually, and always cap the nail tip with top coat — this locks in the design and prevents chipping right where the fade ends.
A less obvious mistake: over-filing the nail edge to “fix” an uneven blend line. This thins the nail plate and can weaken it over time. If a line looks off, it’s safer to add another light dab of polish than to file it down.
Can You Combine Gradient and Ombre Styles?
Once you’ve mastered both techniques separately, you can merge them for a look that’s entirely your own. One popular hybrid is a French ombre gradient, where the nail fades from a sheer pink base into a bright white tip while a subtle horizontal shimmer adds dimension. This style is especially popular for bridal nails because it feels timeless with a modern edge.
You could also try a reverse ombre with a gradient twist, placing the deepest shade near your cuticle and blending outward into a completely different color at the tip. Nail art is meant to be expressive, so if you dream up a look that borrows from both worlds, go for it.
When to Let a Professional Handle It
Both looks are genuinely doable at home, but if your nails are thin, peeling, or recovering from gel/acrylic damage, it’s worth getting the first attempt done by a nail technician. They can judge how much product your nails can handle and adjust the technique so the polish doesn’t trap moisture against a weak nail bed. Once you see how it’s done up close, home attempts usually go much smoother.
Your Most Common Gradient and Ombre Nail Questions Answered
What’s the difference between baby boomer nails and ombre nails?
Baby boomer nails are a specific type of ombre using a soft pink base that fades into a crisp white tip, similar to a modern French manicure. Traditional ombre can use any color family, while baby boomer nails stay strictly in the pink-and-white range.
Can you do ombre nails on very short nails?
Yes, and the vertical fade actually makes shorter nails look longer. Choose a light base and a tip shade that isn’t too dramatically dark so the transition stays gentle and flattering on smaller nail beds.
Do I need a special sponge for gradient nail art?
No. A basic makeup wedge, slightly dampened, works perfectly well. Some nail artists prefer a denser blending sponge, but drugstore options deliver excellent results for most beginners.
How long does a gradient or ombre manicure typically last?
With a solid base coat and a quality top coat, both styles can last up to a week. Gel polish extends wear to two or three weeks, giving you a longer-lasting fade without frequent touch-ups.
Is it hard to remove sponge-blended nail polish?
No harder than removing regular polish. Soak a cotton pad in acetone remover, press it against the nail for about 10–15 seconds, then wipe. Because the colors are applied thinly in layers, they usually come off evenly without extra scrubbing.
Can gel polish be used for gradient or ombre designs?
Yes, though it behaves differently than regular gel polish since it doesn’t blend as freely with a sponge. Most nail techs cure a base layer first, then dab the gel colors on and cure again between layers to keep the fade controlled.
Conclusion
A gradient is a playful horizontal blend of contrasting colors across your nail, while ombre offers a gentle vertical fade within one color family. This simple distinction opens up a whole range of creative choices, whether you want bold color play or a refined, elongated finish. Both styles are fully achievable at home with tools you likely already own — and now you have the exact words to describe the fade you’re after.